Principle of enlargement in a microscope
There are two different methods to enlarge an object with an oval lens. One can place objects either within or outside of the focal distance. In a light microscope normally both methods are combined.
Enlargement within the focal distance
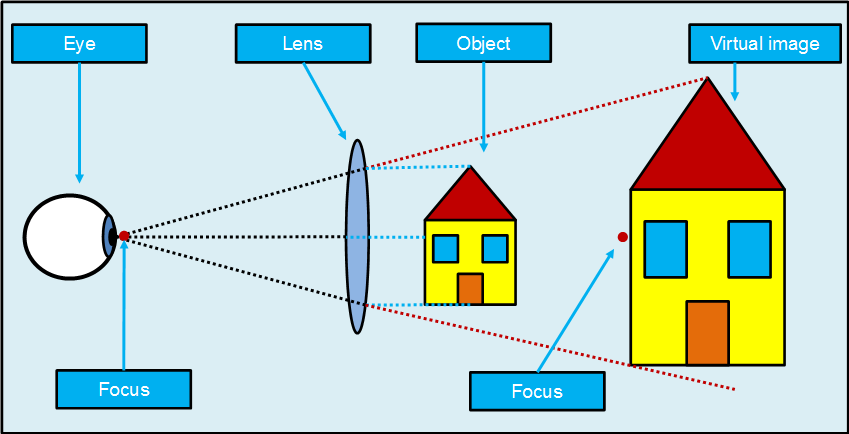
I have explained this method already on the landing page. When placing the object within the focal distance, then the lens works like a magnifying glass. By refracting the light, the object looks larger as it is in real.

The lens generates a virtual picture. A virtual picture is a picture which you can´t project on a surface, like a camera in the cinema.
Enlargement outside of the focal distance
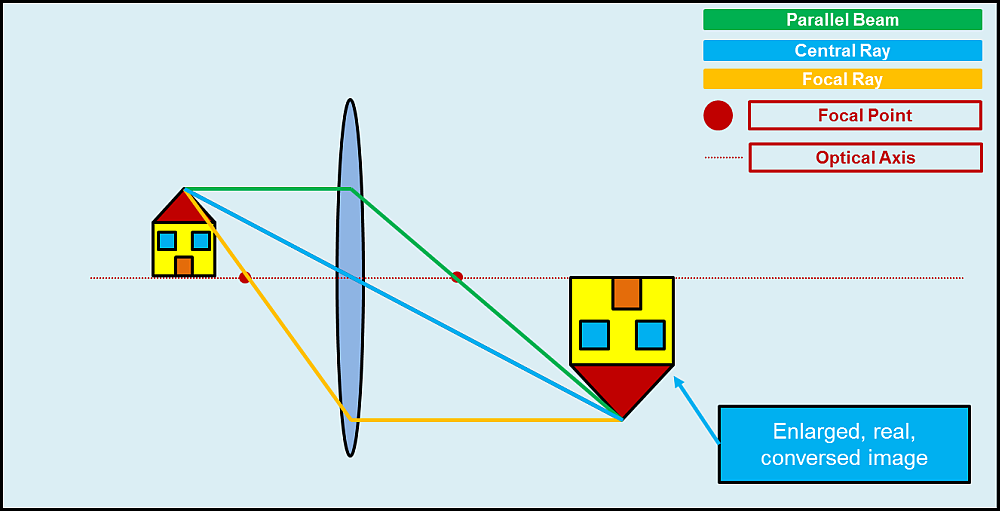
When placing the object outside of the focal distance, the constellation becomes more complicated. For better understanding, I´ve used different colors in the picture.

The GREEN rays run parallel to the optical axis. These parallel beams are refracted in a way, so they all meet in the focal point, after leaving the lens. Central rays (BLUE) enter the lens in an angle, which stays the same after leaving. Focal rays (ORANGE) pass through the focus and they leave the lens as parallel beams. All these beams meet in one point. This is the point, where a clear picture can be generated, which is larger, than the original object. Additionally it is reverse. It is a so called reverse-real image. It is called real image, because this image can be projected on a surface. When you place a white sheet in the focal distance on the right side of the lens, you can see the object on the sheet. This is the way how a projector works in the cinema.
Combination of both methods
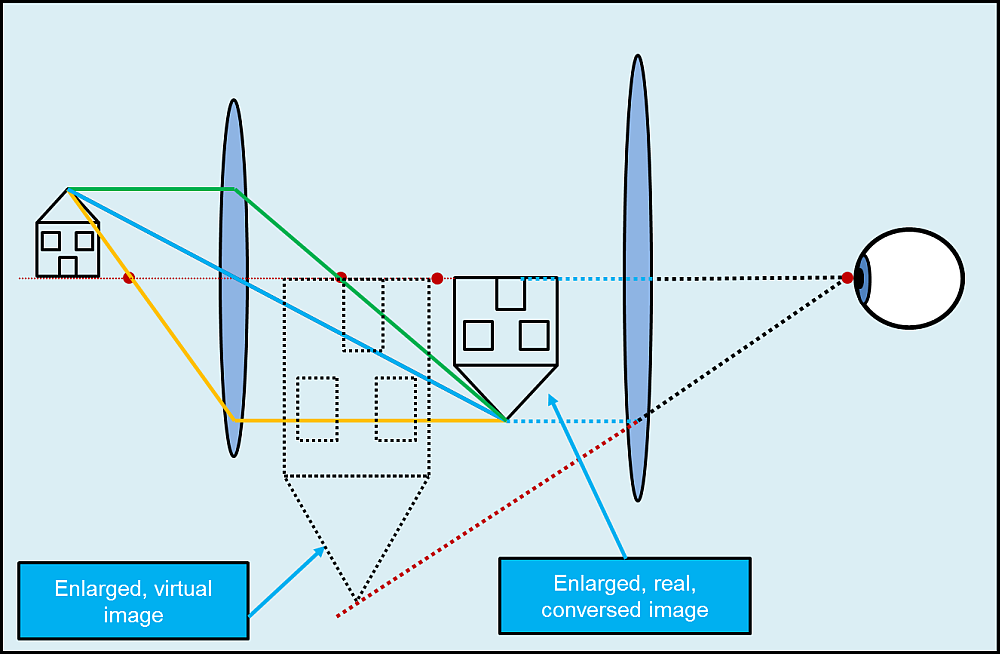
In a light microscope normally both enlarging methods are utilized, like shown in the picture below. I´ve removed some colors again to avoid irritatation.

In the first step, the object is placed outside of the focal distance of the lens. This generates an enlarged-reverse-real image. This real image lies within the focal distance of the second lens, so it is enlarged again as a virtual image. So what a microscope really does is: to enlarge an already enlarged picture. The result is, that the enlarging effects the lenses multiply. This is, why microscopes can reach a much higher enlargement factor than simple lenses.
How to calculate the increase factor of a microscope
Ocular: 10x
Objective: 3,5x / 10x / 40x
These figures show the factor of every single lens on its own. The total increase factor of the combined lenses can be calculated by multiplying them with each other. In our case, the microscope can enlarge by factor: 35 / 100 / 400.
Sometimes, there is an additional factor on the lens tube, like 1,25x. This figure has to be multiplied, too. In total we would get: 43,75 / 125 / 500
Limits of optical magnification
Optical enlargement reaches its barriers at a factor of 1000-1200. The wavelength of light is the limiting criteria. The reason is, that in this range, a light beam is simply bigger than the observed object. From this point on, a microscope can´t generate useful pictures.

The picture shows light rays as red points (the color has no special meaning), which run through an object. The points are small enough to draw a reasonable contour. The picture in the middle shows the same object, but it is smaller in relation to the light beams. In this case, the beams are too large to draw a contour. A virus for example is such an object. In most cases a virus is too small for a light microscope. Their visualization requires another methods. They can be seen with an electron microscope.
The picture on the right shows, that light rays are not like pipelines, like shown in the first two pictures. They are particles of energy, which run in waves. These waves have a certain radius and they are the reason, that one can´t endlessly enlarge with a light microscope.